Tag: search

SharePoint 2013 Search, the alternative of scopes


Hello

There are no scopes in SP 2013 ( we now have “Result sources” instead),  so no more search scope dropdown  !!!! 😦

image_thumb24

but don’t worry, there is a way to have them back.

1) to test this out please create a basic search center

01


2) go to the result page by writing test for exemple and then hitting search and then edit the page

02


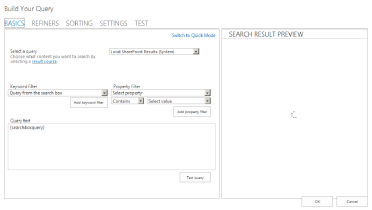
3) Edit the “Search Results” web part and click change query

03


4)Edit the query to match your scope.

04

5)For example, we added a “Path” variable to only search in this site

05


This page will be your new drop down menu selection. The above image shows a search that will only return items that match what is typed in the Search Box + sp2013-dev:14455/* in their URL.
6) Edit the page, and edit your search box web part, then Select “Turn on drop-down” and “Use this site’s Search Settings” in the web part menu, and hit apply.

06


7) Next, click on “Search Settings” to edit your sites search settings
07

8)Ensure the drop-down and use parent settings are applied, and then add a new link.

08

9)Fill out the title and URL (the URL is the link to your Search Result page), and click OK.

09


i added another link named active documents

10) Save your new Search Settings, and test out Search 2013 with the familiar drop-down menu

10


How to set up a product-centric website in SharePoint Server 2013


Hello

today i am rebloging an excellent post that i found on the internet. it is called

How to set up a product-centric website in SharePoint Server 2013

it shows you how you can use SharePoint Server 2013 to set up a website that is based on product catalog data. and then the author shows you how to use the cross-site publishing feature, and how you can use SharePoint search features to influence how product data is displayed to visitors on a site

http://blogs.technet.com/b/tothesharepoint/archive/2013/02/14/how-to-set-up-a-product-centric-web-site-in-sharepoint-2013.aspx

it is a complete and very helful post

Enjoy.

Create Managed Properies and add them to the advanced search Sharepoint 2010

Create Managed Properies and add them to the advanced search Sharepoint 2010


Hello 🙂
Today i will show you how to create and configure new search metadata and add it to an advanced search properties like the one you see below:

1

First of all we need to create the managed property:
1. go to central administration application management page and click on manage service applications.

2
2. select Search Service Application then click manage from the ribbon bar.

3
3.In the bar on the left click Metadata Properties.

5
4- Then click new managed property.

6

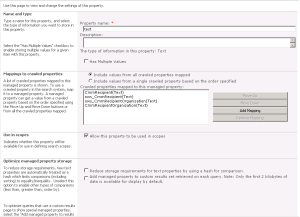
we are gonna create a managed property named Test that combines 4 crowled properties ( site columns):

5. Enter the property name and the description. In the use in scope section check the Allow this property to be used in scopes option.

6. click add mapping and choose you crowled property:

8

Click ok then.

You must start full crawling otherwise you property will not be recognised.

Now that we have our managed property lets go back to our advanced search webpart.

7. Go to your advanced search web part then click edit page.

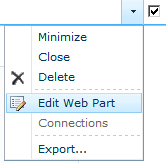
8. Select “Edit Web part” from the Edit menu on the advanced search web part.

9

9. in the Properties section and then click on the XML and expand it:


Add the tag of your property in the property definitions section modify the DataType attrbuite with your property data type “your site column data type” and add another element in the result types section “this will appear in the advanced search properties dropdown list” of the XML as it’s shown below. Then when you finish click ok.

example

<PropertyDef Name=”test” DataType=”text” DisplayName=”Destinataire”/>
</PropertyDefs>
<ResultTypes>
<ResultType DisplayName=”Tous” Name=”default”>
<KeywordQuery/>
<PropertyRef Name=”test” />

</ResultType>
</ResultTypes>

11.  Now go to the search page. You will find the destinataire is added to the properties as below.

11

if you have any questions i will be happy to answer them 🙂

FAST Search for SharePoint : Query API


Hello again 🙂

We all have to agree that search plays an integral part of any successful SharePoint deployment and is an area that Microsoft continues to invest in with each new release of SharePoint.

In this exercise, you will build a .NET console application to submit a query to FAST Search and parse the resulting dataset.

First of all we are going to Retrieve results from FAST Search using the Web Service search.asmx and then we are going to display them on the console.

So lets Get Started 😉

1. we are going to test the Web Service so open your browser and type your server name /_vti_bin/search.asmx

and to take a look at the WSDL file of the WebService click on Service Description

you can also have more informations on the methods displayed by clicking on them.

2. lets move on to our project !! First of all create a console project in Visual studio 2010 named TestSearch

3. Then we are going to reference the WebService.

4. put this data in the form

Address: http://intranet.contoso.com/_vti_bin/search.asmx

Namespace: QueryService

Your Service Reference should look like this. OK to save your changes.

Wait for the Service Reference to create.

Ensure the new Service Reference is listed in the Solution Explorer pane.

5. Edit the app.config file.

6. Build your application:

7. Edit the program.cs file.

a. Add this code to the Main method.

b. then add this security code to check for Windows credentials. These methods require System.Net.

client.ClientCredentials.Windows.ClientCredential = CredentialCache.DefaultNetworkCredentials;

client.ClientCredentials.Windows.AllowedImpersonationLevel =     System.Security.Principal.TokenImpersonationLevel.Impersonation;

c. then add the Query:

e. finally Execute a search using QueryEx.

System.Data.DataSet dataset = client.QueryEx(queryXML);

f. and Retrieve the TotalRows, Title, Rank, Size, and HitHightlightedSummary from the relevantresults datatable.

string totalRows = dataset.Tables[“relevantresults”].ExtendedProperties[“TotalRows”].ToString();

Console.WriteLine(“Total Results:” + totalRows);

int itotalRows = Convert.ToInt32(totalRows);

for (int i = 0; ((i < 10) && (i < itotalRows)); i++)

{

Console.WriteLine(“Rank: ” + dataset.Tables[“relevantresults”].Rows[i][“Rank”].ToString());

Console.WriteLine(“Title: ” + dataset.Tables[“relevantresults”].Rows[i][“Title”].ToString());

Console.WriteLine(“Size: ” + dataset.Tables[“relevantresults”].Rows[i][“Size”].ToString());

Console.WriteLine(“Summary: ” + dataset.Tables[“relevantresults”].Rows[i][“HitHighlightedSummary”].ToString());

}

Console.Read();

and here is the result 🙂